Two of the most common forms of network address translation (NAT) are dynamic port address translation (PAT) and static NAT.
PAT is the many-to-one form of NAT implemented in many small office and home networks where many internal hosts, typically using RFC 1918 addresses such as 192.168.0.0/24, share a single external address on the public Internet. Static NAT is a one-to-one mapping which is used when an internal host needs to be accessible from the public Internet or some other external network.
Here we will explain how to configure static NAT to make an internal Web server accessible from an external network. The same concept applies when you want to make any internal server accessible from an external network, whether it’s a Web server, a mail server, an FTP server, or any other type of server or device.
This is based on ASA software Version 9.0(1) and applies to Version 8.3 and later.
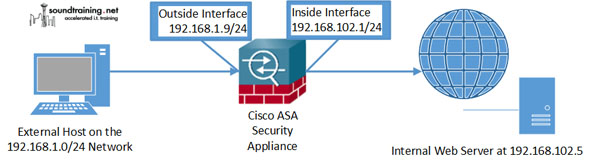
Use the following diagram with this documentation. This diagram uses RFC 1918 addresses. In the real world, the outside interface would most likely be configured with a registered, public address.
There are four steps involved in enabling static NAT:
1. Create the network object and static NAT statement. A network object must be created identifying the internal host. Within the network object, you must also create a static NAT statement to identify the outside interface, its IP address, and the type of traffic to be forwarded: object network InternalHost host 192.168.102.5 nat (inside,outside) static interface service tcp 80 80.
2. Create a NAT statement identifying the outside interface. Note that, in the static NAT statement above, the use of the term interface tells NAT to use whatever address is on the outside interface. The first use of 80 identifies the originating port number. The second use of 80 identifies the destination port number.
3. Build the Access-Control List. Build the Access-Control List to permit the traffic flow (this statement goes on a single line): access-list OutsideToWebServer permit tcp any host 192.168.102.5 eq www.
4. Apply the ACL to the outside interface using the Access-Group command: access-group OutsideToWebServer in interface outside. This is the complete configuration:

When successfully implemented, this configuration will permit a host on the outside network, such as the public Internet, to connect to the internal Web server using the address on the ASA’s outside interface.
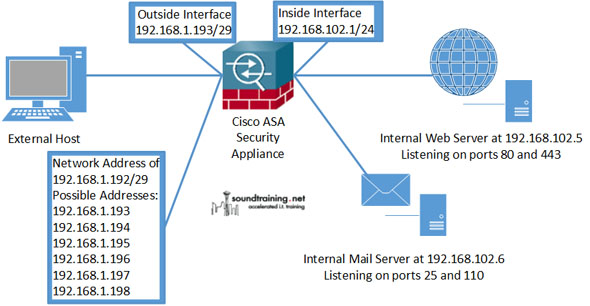
Configuring the ASA with Multiple Outside Interface Addresses
It is not possible to assign multiple IP addresses to the outside interface on a Cisco ASA security appliance. It is possible, however, to configure the ASA to forward different outside addresses to different hosts on the inside network.
For example, you have a /29 block of addresses assigned by your ISP. Also, suppose you have a mail server using POP3 and SMTP and a Web server using HTTP and HTTPS on the inside network. You want each of the servers to be reachable via different outside addresses. You can configure static NAT to accomplish this (see diagram, and again, in the real world the outside interface would probably be configured with registered, public addresses instead of the RFC 1918 addresses shown here).
The steps are similar for single-address static NAT configuration:
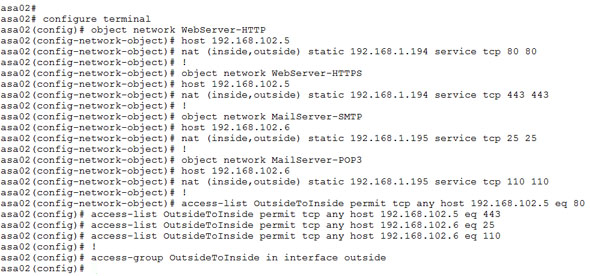
1. Configure network objects. Configure a network object for each internal host with a static NAT static statement specifying the outside address to be used and the service types (port numbers) to be forwarded. These identify the internal hosts, the desired outside IP address, and the type of service to be forwarded. (The exclamation marks are for formatting to improve readability and are not required for the configuration.)
object network WebServer-HTTP
host 192.168.102.5
nat (inside,outside) static 192.168.1.194 service tcp 80 80
!
object network WebServer-HTTPS
host 192.168.102.5
nat (inside,outside) static 192.168.1.194 service tcp 443 443
!
object network MailServer-SMTP
host 192.168.102.6
nat (inside,outside) static 192.168.1.195 service tcp 25 25
!
object network MailServer-POP3
host 192.168.102.6
nat (inside,outside) static 192.168.1.195 service tcp 110 110
Note that in the above configurations the host statement identifies the internal server (192.168.102.5 is the Web server and 192.168.102.6 is the mail server). The NAT statement identifies the external address used to forward the specified packets to the internal host.
2. Configure Access-Control Lists to permit the traffic flows. This Access-Control List permits the traffic flows against the security levels (each access-list statement goes on a single line).
access-list OutsideToInside permit tcp any host 192.168.102.5 eq 80
access-list OutsideToInside permit tcp any host 192.168.102.5 eq 443
access-list OutsideToInside permit tcp any host 192.168.102.6 eq 25
access-list OutsideToInside permit tcp any host 192.168.102.6 eq 110
3. Apply the Access-Control List to the outside interface with an access-group statement.
access-group OutsideToInside in interface outside
Here is the complete configuration:
—Cisco Network Guide and Review from https://www.networkworld.com/news/tech/2013/011613-static-nat-cisco-asa-265898.html
More Related Cisco ASA Tips:
Site-to-Site IPSEC VPN between Two Cisco ASA 5520
How to Configure Dual ISP on Cisco ASA 5505?
Cisco ASA 8.4 vs. Typical NAT/PAT Configuration
Eight Commands on a Cisco ASA Security Appliance You Should Know
VLAN Sub-Interfaces on Cisco ASA 5500 Firewall Configuration
How to Configure Cisco ASA 5505 Firewall?