
It’s not a rumor that Cisco released its new Cisco ASA 5506-X. Of course, it’s one of ASA 5500-X series. Maybe it becomes the best substitute of ASA 5505. Someone is looking forward to this. If we talk about the Cisco ASA 5506-X, we need to know the Cisco ASA with FirePOWER Services. It brings distinctive threat-focused next-generation security services to the Cisco ASA 5500-X Series Next-Generation Firewalls and Cisco ASA 5585-X Adaptive Security Appliance firewall products. Recently, Cisco also released its Cisco ASA with FirePOWER Services for SMB. The newest additions to the Cisco ASA with FirePOWER Services NGFW family are tailor-made for small and medium businesses (SMB) and branch office applications, delivering integrated threat defense, low procurement and operating costs, and simplified security management.
Cisco ASA with FirePOWER Services
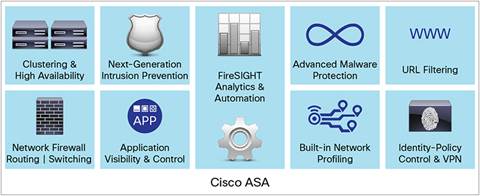
What benefits will you get from the Cisco ASA with FirePOWER Services for SMB? Let’s have a quick check…
- Superior threat defense with the same industry-leading security technology found in larger Cisco next-generation firewalls.
- Appropriately sized and affordably priced for smaller and midsized company budgets, including a low total cost of ownership.
- Simplified on-device management or optional centralized management for multiple device installations.
The solution is available in both desktop (5506-X) and 1RU rack-mount (5508-X) form factors. Variants of the desktop model are available with an integrated wireless access point (5506W-X) to simplify SMB networking. A ruggedized appliance (5506H-X) for industrial control systems and critical infrastructure applications is also forthcoming.
Cisco ASA 5506-X with FirePOWER Services
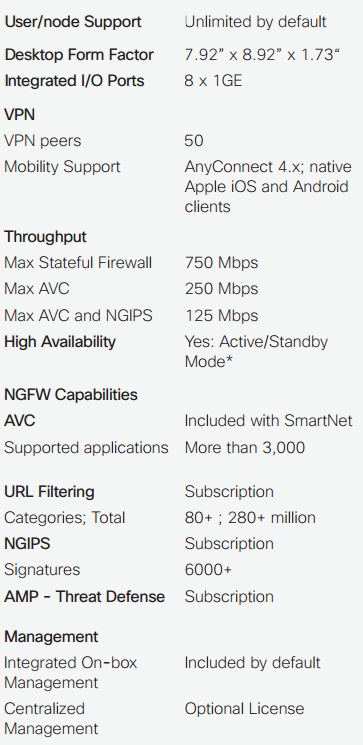
* Requires Security Plus License
Well, in the following part, we will share the simple guide to start a Cisco ASA 5506-X with FirePOWER Services.
Firstly, you need to check the package contents of Cisco ASA 5506-X


Pay attention to Power on the ASA
1. Attach the power cable to the ASA and connect it to an electrical outlet.
The power turns on automatically when you plug in the power cable. There is no power button.
2. Check the Power LED on the back of the ASA; if it is solid green, the device is powered on.
3. Check the Status LED on the back of the ASA; after it is solid green, the system has passed power-on diagnostics.
Modify the Initial Configuration for the ASA FirePOWER Module
The ASA ships with a default configuration that enables Adaptive Security Device Manager (ASDM) connectivity to theManagement 1/1 interface. When you use the ASA FirePOWER module, we recommend that you do not use the default configuration. This section describes how to apply a new configuration so you can use the following module:
- ASA FirePOWER module—Requires Internet access for updates.
This configuration also enables a basic usable configuration for an inside and outside network.
The following figure shows the suggested network deployment for the ASA 5506-X with the ASA FirePOWER module:
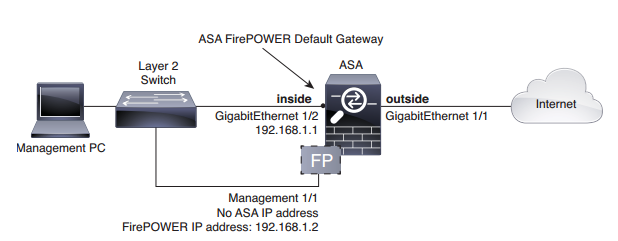
This procedure lets you connect to the ASA console port and paste in a new configuration that configures the following behavior:
- inside –> outside traffic flow
- outside IP address from DHCP
- DHCP for clients on inside.
- Management 1/1 interface is Up, but otherwise unconfigured. The ASA FirePOWER module can then use this interface to access the ASA inside network and use the inside interface as the gateway to the Internet.
- ASDM access on the inside interface
To achieve the above configuration of a Cisco AS 5506-X, perform the following steps.
1. Connect your computer to the ASA console port with the supplied console cable or with a mini-USB cable
2. Launch a terminal emulator and connect to the ASA.
3. Press the Enter key to see the following prompt:
ciscoasa>
4. Access privileged EXEC mode:
enable
The following prompt appears:
Password:
5. Press Enter. By default, the password is blank.
6. Access global configuration mode:
configure terminal
7. Clear the configuration:
clear configure all
8. Copy and paste the following configuration at the prompt:
interface gigabitethernet1/1
nameif outside
ip address dhcp setroute
no shutdown
interface gigabitethernet1/2
nameif inside
ip address 192.168.1.1 255.255.255.0
security-level 100
no shutdown
interface management1/1
no shutdown
object network obj_any
subnet 0 0
nat (any,outside) dynamic interface
http server enable
http 192.168.1.0 255.255.255.0 inside
dhcpd address 192.168.1.5-192.168.1.254 inside
dhcpd auto_config outside
dhcpd enable inside
logging asdm informational
9. Save the new configuration:
write memory
10. Cable the following to a Layer 2 Ethernet switch:
– Inside GigabitEthernet 1/2 interface (inside)
– Management 1/1 interface
– Your computer
11. Connect the GigabitEthernet 1/1 (outside) interface to your WAN device, for example, your cable modem.
Besides the basic guide to start a Cisco ASA 5506-X series, how to launch ASDM and how to Configure the ASA FirePOWER Module? You can read the full guide here https://www.cisco.com/c/en/us/td/docs/security/asa/quick_start/5506X/5506x-quick-start.html
More Related Cisco ASA 5500-X series Topics
What are the Considerations While Buying a Cisco Next-Generation Firewall?
Cisco ASA 5500-X Series’ New Features & Main Model Comparison
Does Cisco ASA 5500-X Series Support Both IPS and AVC/WSE in One Box?
ASA 5505 vs. ASA 5510 vs. ASA 5512-X vs. ASA 5515-X
The New Cisco ASA 5506-X, More Comparisons

Expertise Builds Trust
20+ Years • 200+ Countries • 21500+ Customers/Projects
CCIE · JNCIE · NSE7 · ACDX · HPE Master ASE · Dell Server/AI Expert
