

A static NAT (Network Address Translation) configuration creates a simple translation entry in the NAT table, translating a particular local address to a specific global address and vice versa. These entries always remain in the table and are removed only if the configuration is removed.
Static NAT configuration with the route-map option can be used to implement destination-based NAT scenarios where the same inside local address needs to be translated to more than one inside global address, depending on where the traffic is destined. This type of configuration will create an extended translation entry in the NAT table and will be useful when a network is multi-homed to different provider networks or partner networks, and the same inside local address has to be translated to different inside global addresses.
This method is also useful when using NAT and IP Security (IPsec) together on a router to reach a public network like the Internet, as well as other Virtual Private Network (VPN) sites through the same NAT outside interface. The route-map option can be used to translate only traffic going to the public network. It does not translate traffic destined for other VPN sites reached through the public network. Though there are other ways of achieving the same thing, this option allows the user to implement such a scenario without degrading router performance.
Configuration overview:
To configure static NAT with route maps, use the following steps:
1) The first step in any NAT configuration is to define the inside and outside interfaces.
This can be done by issuing the ip nat inside command and the ip nat outside command under the specific interface configuration mode.
2) Use the following command to define an extended access list and the parameters of the access list:
access−list <acl−number> {deny|permit} <protocol> <source> <source−wildcard> <destination> <destination−wildcard>
The access list should specify which traffic arriving at the inside interface and destined to the outside interface is eligible to create a translation entry.
3) Configure route map and define the parameters of the route map.
4) Use below command to enable static NAT with route maps configured on the inside interface:
ip nat inside source list {acl−number|acl−name} pool pool−name[overload]|static local−ip global−ip route−map map−name}
Configuration overview:
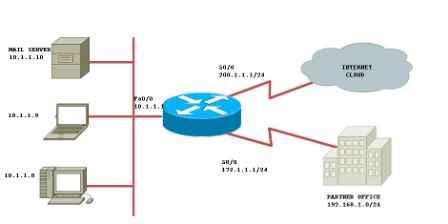
A router R1 connects to the Internet through interface serial0/0 and is connected through interface serial0/1 to a partner network which uses the 192.168.1.0/24 address space. The LAN interface of the router is connected to the corporate inside network which belongs to the 10.0.0.0/8 network. The requirement is that an inside host 10.1.1.10, which could be a mail server, should be translated to address 200.1.1.10 when communicating with the Internet. The same host should be translated to the 172.16.1.10 address when communicating with the partner network.
Topology Diagram:
Router R1 static NAT with route map configuration:
Step1
interface Fa0/0
ip address 10.1.1.1 255.255.255.0
ip nat inside
!—This connects to the corporate network, designated as NAT inside interface.
interface S0/0
ip address 200.1.1.1 255.255.255.0
ip nat outside
!—This connects to Internet, designated as NAT outside interface.
interface Serial0/1
ip address 172.16.1.1 255.255.255.0
ip nat outside
!—This connects to the Partner network, designated as NAT outside interface
Step2
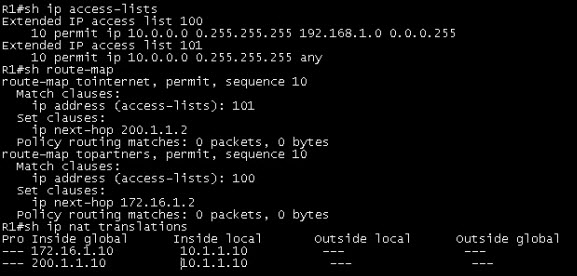
access-list 100 permit ip 10.0.0.0 0.255.255.255 192.168.1.0 0.0.0.255
!—This Access Control List (ACL) permits traffic from all hosts in the corporate network destined for the partner network.
access-list 101 permit ip 10.0.0.0 0.255.255.255 any
!—This ACL permits traffic from all hosts in the corporate network going to any destination on the Internet.
Step3
route-map topartners permit 10
match ip address 100
set ip next-hop 172.16.1.2
!—This route-map matches all traffic matched by ACL 100 and going out of interface serial 0/1. In other words, all traffic from the corporate network to the partner network is matched.
route-map tointernet permit 10
match ip address 101
set ip next-hop 200.1.1.2
!—This route-map matches all traffic matched by ACL 101 and going out of interface serial 0/0. In other words, all traffic from the corporate network to the Internet is matched.
Step4
ip nat inside source static 10.1.1.10 172.16.1.10 route-map topartners
! —The above line configures a static NAT mapping for the inside host 10.1.1.10 to the global address 172.16.1.10 to be used for traffic matched by the route-map to partners.
ip nat inside source static 10.1.1.10 200.1.1.10 route-map tointernet
!—The above line configures a static NAT mapping for the inside host 10.1.1.10 to the global address 200.1.1.10 to be used for traffic matched by the route-map to the Internet.
Verification command:
Related Information
NAT – Ability to Use Route Maps with Static Translations
—From https://supportforums.cisco.com/docs/DOC-5061
More Related:
How to Configure Static NAT on a Cisco ASA?
How to Configure Static NAT on Cisco Routers

Expertise Builds Trust
20+ Years • 200+ Countries • 21500+ Customers/Projects
CCIE · JNCIE · NSE7 · ACDX · HPE Master ASE · Dell Server/AI Expert
