
Introduction to Routing Information Protocol (RIP)
IP RIP (Routing Information Protocol) comes in two different versions: 1 and 2. Version 1 is a distance vector protocol (RFC 1058) and Version 2 is a hybrid protocol (RFCs 1721 and 1722).
Routing Information Protocol Version 1 (RIPv1)
RIPv1 uses local broadcasts to share routing information. These updates are periodic in nature, occurring, by default, every 30 seconds. To prevent packets from circling around a loop forever, both versions of RIP solve counting to infinity by placing a hop count limit of 15 hops on packets. Any packet that reaches the sixteenth hop will be dropped. RIPv1 is a classful protocol. RIP supports up to six equal-cost paths to a single destination. Equal-cost path are the paths where the metric is same (Hop count).
Routing Information Protocol (RIPv2)
RIPv2 is a distance vector protocol with routing enhancements built into it, and it is based on RIPV1. Therefore, it is commonly called a hybrid protocol.
RIPv2 uses multicasts instead of broadcasts. RIPv2 supports triggered updates. When a change occurs, a RIPv2 router will immediately propagate its routing information to its connected neighbors. RIPv2 is a classless protocol and it supports variable-length subnet masking (VLSM).
Both RIPv1 and RIPv2 uses hop count as the metric.
Differences between RIPv1 and RIPv2
RIPv1
• Supports only classful routing (Does not support VLSM).
• No authentication.
• RIPv1 uses Broadcast.
RIPv2
•Supports classless routing (Supports VLSM).
RIPv2 incorporates the addition of the network mask in the update to allow classless routing advertisements.
• Authentication is available.
• RIPv2 uses multi-cast instead of broadcast. Multicast communication reduces the burden on the network devices that do not need to listen to RIP updates.
Routing Information Protocol (RIP) Configuration
Routing Information Protocol (RIP) can be configured in a router using the following IOS commands. The “version 2” IOS command specifies that we are using RIPv2.
Router>enable
Router#configure terminal
Router(config)# router rip
Router(config-router)# version 2
Router(config-router)# network network_idRouting Information Protocol (RIP) – Lab Practice
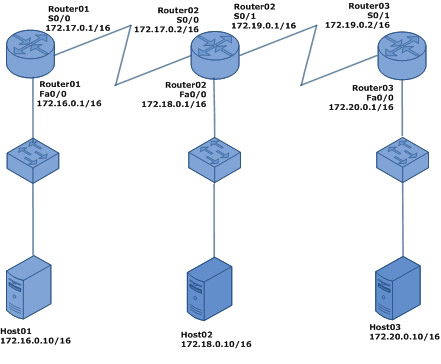
The following diagram shows our lab setup. We have three routers, three switches and three hosts connected as below. The host names, IP addresses and the interfaces of the routers are shown in diagram. The IP addresses of the hosts are also shown in the diagram.
Hostname and IP address configuration in Router01
Connect to Router01 console and use the following IOS commands to configure host name as Router01.
Router>enable
Router#configure terminal
Enter configuration commands, one per line. End with CNTL/Z.
Router(config)#hostname Router01
Router01(config)#
Use the following IOS commands to open the fast ethernet interface Fa0/0 configuration mode on Router01 and configure IP address as 172.16.0.1/16.
Router01>enable
Router01#configure terminal
Enter configuration commands, one per line. End with CNTL/Z.
Router01(config)#interface fa0/0
Router01(config-if)#ip address 172.16.0.1 255.255.0.0
Router01(config-if)#no shutdown
Use the following IOS commands to open the serial interface S0/0 configuration mode on Router01 and configure IP addressas 172.17.0.1/16. You have to set a clock rate also using the “clock rate” command on S0/0 interface, since this is the DCE side.
Router01>enable
Router01#configure terminal
Enter configuration commands, one per line. End with CNTL/Z.
Router01(config)#interface s0/0
Router01(config-if)#clock rate 64000
Router01(config-if)#ip address 172.17.0.1 255.255.0.0
Router01(config-if)#no shutdown
Do remember to run the “copy running-config startup-config” command from enable mode, if you want to save the changes you have made in the router.
Hostname and IP address configuration in Router02
Connect to Router02 console and use the following IOS commands to configure host name as Router02.
Router>enable
Router#configure terminal
Enter configuration commands, one per line. End with CNTL/Z.
Router(config)#hostname Router02
Router02(config)#
Use the following IOS commands to open the fast ethernet interface Fa0/0 configuration mode on Router02 and configure IP address as 172.18.0.1/16.
Router02>enable
Router02#configure terminal
Enter configuration commands, one per line. End with CNTL/Z.
Router02(config)#interface fa0/0
Router02(config-if)#ip address 172.18.0.1 255.255.0.0
Router02(config-if)#no shutdown
Use the following IOS commands to open the serial interface S0/0 configuration mode on Router02 and configure IP addressas 172.17.0.2/16.
Router02>enable
Router02#configure terminal
Enter configuration commands, one per line. End with CNTL/Z.
Router02(config)#interface s0/0
Router02(config-if)#ip address 172.17.0.2 255.255.0.0
Router02(config-if)#no shutdown
Use the following IOS commands to open the serial interface S0/1 configuration mode on Router02 and configure IP addressas 172.19.0.1/16. You have to set a clock rate also using the “clock rate” command on S0/1 interface, since this is the DCE side.
Router02>enable
Router02#configure terminal
Enter configuration commands, one per line. End with CNTL/Z.
Router02(config)#interface s0/1
Router02(config-if)#clock rate 64000
Router02(config-if)#ip address 172.19.0.1 255.255.0.0
Router02(config-if)#no shutdown
Do remember to run the “copy running-config startup-config” command from enable mode, if you want to save the changes you have made in the router.
Hostname and IP address configuration in Router03
Connect to Router03 console and use the following IOS commands to configure host name as Router03.
Router>enable
Router#configure terminal
Enter configuration commands, one per line. End with CNTL/Z.
Router(config)#hostname Router03
Router03(config)#
Use the following IOS commands to open the fast ethernet interface Fa0/0 configuration mode on Router03 and configure IP address as 172.20.0.1/16.
Router03>enable
Router03#configure terminal
Enter configuration commands, one per line. End with CNTL/Z.
Router03(config)#interface fa0/0
Router03(config-if)#ip address 172.20.0.1 255.255.0.0
Router03(config-if)#no shutdown
Use the following IOS commands to open the serial interface S0/1 configuration mode on Router03 and configure IP addressas 172.19.0.2/16.
Router03>enable
Router03#configure terminal
Enter configuration commands, one per line. End with CNTL/Z.
Router03(config)#interface s0/1
Router03(config-if)#ip address 172.19.0.2 255.255.0.0
Router03(config-if)#no shutdown
Do remember to run the “copy running-config startup-config” command from enable mode, if you want to save the changes you have made in the router.
Routing Information Protocol Version 2 (RIPv2) configuration in Router01
Connect to Router01 console and use the following IOS commands to configure Routing Information Protocol Version 2 (RIPv2) in Router01. Please refer the beginning of this lesson to view the Routing Information Protocol Version 2 (RIPv2) configuration IOS commands.
Using the IOS “network” command, as shown below, we specify only the directly connected networks of this router.
Router01>enable
Router01#configure terminal
Enter configuration commands, one per line. End with CNTL/Z.
Router01(config)#router rip
Router01(config-router)#version 2
Router01(config-router)#network 172.16.0.0
Router01(config-router)#network 172.17.0.0
Router01(config-router)#exit
Router01(config)#exit
Router01#
Do remember to run the “copy running-config startup-config” command from enable mode, if you want to save the changes you have made in the router.
Routing Information Protocol Version 2 (RIPv2) configuration in Router02
Connect to Router02 console and use the following IOS commands to configure Routing Information Protocol Version 2 (RIPv2) in Router02. Please refer the beginning of this lesson to view the Routing Information Protocol Version 2 (RIPv2) configurationIOS commands.
Using the IOS “network” command, as shown below, we specify only the directly connected networks of this router.
Router02>enable
Router02#configure terminal
Enter configuration commands, one per line. End with CNTL/Z.
Router02(config)#router rip
Router02(config-router)#version 2
Router02(config-router)#network 172.17.0.0
Router02(config-router)#network 172.18.0.0
Router02(config-router)#network 172.19.0.0
Router02(config-router)#exit
Router02(config)#exit
Router02#
Do remember to run the “copy running-config startup-config” command from enable mode, if you want to save the changes you have made in the router.
Routing Information Protocol Version 2 (RIPv2) configuration in Router03
Connect to Router03 console and use the following IOS commands to configure Routing Information Protocol Version 2 (RIPv2) in Router03. Please refer the beginning of this lesson to view the Routing Information Protocol Version 2 (RIPv2) configurationIOS commands.
Using the IOS “network” command, as shown below, we specify only the directly connected networks of this router.
Router03>enable
Router03#configure terminal
Enter configuration commands, one per line. End with CNTL/Z.
Router03(config)#router rip
Router03(config-router)#version 2
Router03(config-router)#network 172.19.0.0
Router03(config-router)#network 172.20.0.0
Router03(config-router)#exit
Router03(config)#exit
Router03#
Do remember to run the “copy running-config startup-config” command from enable mode, if you want to save the changes you have made in the router.
How to View the Routing Table in Router01
After the network is converged after the initial configuration and Routing Information Protocol Version 2 (RIPv2) configuration, we can use the “show ip route” to view the routing table in Router01, as shown below.
Router01>enable
Router01#show ip route
Codes: C – connected, S – static, I – IGRP, R – RIP, M – mobile, B – BGP
D – EIGRP, EX – EIGRP external, O – OSPF, IA – OSPF inter area
N1 – OSPF NSSA external type 1, N2 – OSPF NSSA external type 2
E1 – OSPF external type 1, E2 – OSPF external type 2, E – EGP
i – IS-IS, L1 – IS-IS level-1, L2 – IS-IS level-2, ia – IS-IS inter area
* – candidate default, U – per-user static route, o – ODR
P – periodic downloaded static routeGateway of last resort is not set
C 172.16.0.0/16 is directly connected, FastEthernet0/0
C 172.17.0.0/16 is directly connected, Serial0/0
R 172.18.0.0/16 [120/1] via 172.17.0.2, 00:00:22, Serial0/0
R 172.19.0.0/16 [120/1] via 172.17.0.2, 00:00:22, Serial0/0
R 172.20.0.0/16 [120/2] via 172.17.0.2, 00:00:22, Serial0/0
The “R” character at the beginning of a line in routing table shows that it is a route discovered by Routing Information Protocol Version 2 (RIPv2) and “C” character shows that it is a directly connected network.
How to view the routing table in Router02
When the network is converged after the initial configuration and Routing Information Protocol Version 2 (RIPv2) configuration, we can use the “show ip route” to view the routing table in Router02, as shown below.
Router02>enable
Router02#show ip route
Codes: C – connected, S – static, I – IGRP, R – RIP, M – mobile, B – BGP
D – EIGRP, EX – EIGRP external, O – OSPF, IA – OSPF inter area
N1 – OSPF NSSA external type 1, N2 – OSPF NSSA external type 2
E1 – OSPF external type 1, E2 – OSPF external type 2, E – EGP
i – IS-IS, L1 – IS-IS level-1, L2 – IS-IS level-2, ia – IS-IS inter area
* – candidate default, U – per-user static route, o – ODR
P – periodic downloaded static routeGateway of last resort is not set
R 172.16.0.0/16 [120/1] via 172.17.0.1, 00:00:07, Serial0/0
C 172.17.0.0/16 is directly connected, Serial0/0
C 172.18.0.0/16 is directly connected, FastEthernet0/0
C 172.19.0.0/16 is directly connected, Serial0/1
R 172.20.0.0/16 [120/1] via 172.19.0.2, 00:00:20, Serial0/1
The “R” character at the beginning of a line in routing table shows that it is a route discovered by Routing Information Protocol Version 2 (RIPv2) and “C” character shows that it is a directly connected network.
How to View the Routing Table in Router03
When the network is converged after the initial configuration and Routing Information Protocol Version 2 (RIPv2) configuration, we can use the “show ip route” to view the routing table in Router03, as shown below.
Router03>enable
Router03#show ip route
Codes: C – connected, S – static, I – IGRP, R – RIP, M – mobile, B – BGP
D – EIGRP, EX – EIGRP external, O – OSPF, IA – OSPF inter area
N1 – OSPF NSSA external type 1, N2 – OSPF NSSA external type 2
E1 – OSPF external type 1, E2 – OSPF external type 2, E – EGP
i – IS-IS, L1 – IS-IS level-1, L2 – IS-IS level-2, ia – IS-IS inter area
* – candidate default, U – per-user static route, o – ODR
P – periodic downloaded static routeGateway of last resort is not set
R 172.16.0.0/16 [120/2] via 172.19.0.1, 00:00:02, Serial0/1
R 172.17.0.0/16 [120/1] via 172.19.0.1, 00:00:02, Serial0/1
R 172.18.0.0/16 [120/1] via 172.19.0.1, 00:00:02, Serial0/1
C 172.19.0.0/16 is directly connected, Serial0/1
C 172.20.0.0/16 is directly connected, FastEthernet0/0
The “R” character at the beginning of a line in routing table shows that it is a route discovered by Routing Information Protocol Version 2 (RIPv2) and “C” character shows that it is a directly connected network.
Verify the Connectivity between Networks Using the Ping Command
To verify the Routing Information Protocol Version 2 (RIPv2) routes and the connectivity between networks, run the ping command from Host01 (IP address: 172.16.0.10/16) to Host03 (IP address: 172.20.0.10/16).
C:\>ping 172.20.0.10
Pinging 172.20.0.10 with 32 bytes of data:
Reply from 172.20.0.10: bytes=32 time=172ms TTL=125
Reply from 172.20.0.10: bytes=32 time=188ms TTL=125
Reply from 172.20.0.10: bytes=32 time=157ms TTL=125
Reply from 172.20.0.10: bytes=32 time=188ms TTL=125Ping statistics for 172.20.0.10:
Packets: Sent = 4, Received = 4, Lost = 0 (0% loss),
Approximate round trip times in milli-seconds:
Minimum = 157ms, Maximum = 188ms, Average = 176ms
The ping reply from Host03 (IP address: 172.20.0.10/16) shows that the Routing Information Protocol Version 2 (RIPv2) is configured well in three routers and there is network connectivity between different networks.
Reference from https://www.omnisecu.com/cisco-certified-network-associate-ccna/how-to-configure-routing-information-protocol-rip.htm
More Related Routing Protocol Tips:
How to Configure IGRP (Interior Gateway Routing Protocol)?
How to Configure EIGRP on a Cisco Router?
How to Configure OSPF on Cisco Routers?
OSPF, How to Configure OSPF in the Cisco IOS?
How to Configure OSPF in a Single Area?

Expertise Builds Trust
20+ Years • 200+ Countries • 21500+ Customers/Projects
CCIE · JNCIE · NSE7 · ACDX · HPE Master ASE · Dell Server/AI Expert
