
The bellow is a quick start to get your Cisco ASA off the ground by the means of a few print screens
It provides an easier way of explaining how to connect to the system for common tasks without the pain of having to know to know complex intimidating techniques.
The bellow section will guide you step by step through configuring and administering a simple Cisco ASA installation including common configurations like:
Initial Configuration
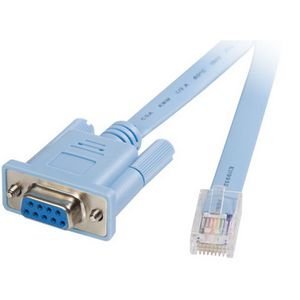
Null modem cable
Firstly you will need a Cisco console cable as shown below cable null modem cable as show below
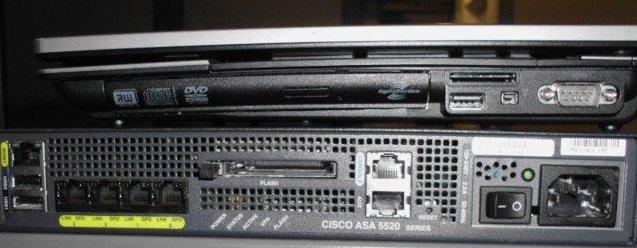
Serial link on laptop
You will need a computer or a laptop with a serial connection to connect to the Cisco ASA 5520 appliance in order to manage it
Connection to the device
Before you can perform the initial configuration of the Cisco ASA you must establish a serial console connection to it. Terminal emulation communication software (Hyper Terminal or equivalent).
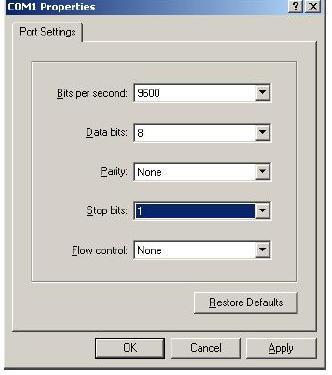
Terminal Emulation Software Settings for hyper Terminal
To establish a serial console connection, set your terminal emulation communication software to operate with the following settings
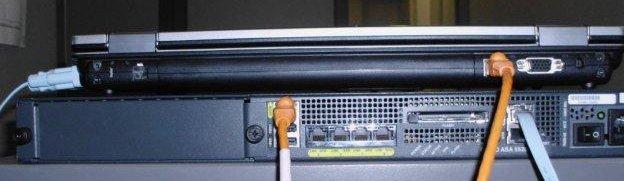
After Establishing a Serial connection a network cable needs to be plugged into the Cisco ASA as well as a serial console connection altogether it should look like that
The initial configuration of the device has to be done on the Command Line Interface and example of that is included bellow
Hostname domain name and SSH keys generation
First of all you need to configure the initial settings of the device with a hostname and a domain name in order to be able generate SSH usage keys
hostname test-asa
domain-name test-asa.com
enable password ZdcH9lbXsA2JtS18 encrypted
passwd 2KFQnbNIdI.2KYOU encrypted
crypto key generate rsa usage-keys
Management interface
Then you need to configure the the management interface with an ip address in order to be able to connect to the computer you are managing the device from
interface Management0/0
speed 100
duplex full
nameif inside
security-level 100
ip address 192.168.1.1 255.255.255.0
Upgrade the Cisco IOS
Then you need to copy the latest release of the cisco IOS software for the appropriate appliance version from the TFTP server (usually your laptop’s ip address here depicted as 192.168.1.100 running a TFTP server that can be downloaded here)
copy tftp://192.168.1.100/asa821-k8.bin flash:
boot system disk0:/asa821-k8.bin
Management Gui Configuration
Then you you need to configure the ASDM gui management interface of the ASA .Bear in mind once the image file is copied to the flash of the device you also need to enable the http server and enable who is able to access the service
copy tftp://192.168.1.100/asdm-621.bin flash:
asdm image disk0:/asdm-621.bin
http server enable
http 0 0 inside
Basic Static Routing Configuration
Then you need to configure the basic outside interface parameters as well as routing on the outside interface so you can communicate with the outside world.Once that’s done you have to enable the transition of traffic from the inside interface trough a feature called network address translation or NAT.A lot of things have been written about nat i am not going to go trough all of them here suffice to say if you issue the bellow commands the translation will happen and you will be able to establish a bridge between the inside and the outside interfaces.
interface GigabitEthernet0/0
speed 100
duplex full
nameif outside
security-level 0
ip address 196.15.131.202 255.255.255.240! the bellow command is used to enable default routing on the ASA device using 196.15.131.201 as the default destination to send its traffic to
route outisde 0 0 196.15.131.201
Basic Global Natting Configuration
The natting feature is basically used on the Cisco ASA as measure of protecting your private network addresses when they are accessing the internet.Its achieved by the bellow commands
nat (inside) 1 192.168.0.0 255.255.0.0
global (outside) 1 interface
More complex Cisco NATing Concepts
The bellow Section Describes natting order of operation in more detail.Cisco ASA natting is considered one of the most complicated and challenging subjects .If it looks intimidating thats because it is .If you require some assistance with that you can always contact us for more info.
Order of NAT Commands Used to Match Real Addresses
The security appliance matches real addresses to NAT commands in the following order:
1. NAT exemption (nat 0 access-list)—In order, until the first match. Identity NAT is not included in this category; it is included in the regular static NAT or regular NAT category. We do not recommend overlapping addresses in NAT exemption statements because unexpected results can occur.
2. Static NAT and Static PAT (regular and policy) (static)—In order, until the first match. Static identity NAT is included in this category.
3. Policy dynamic NAT (nat access-list)—In order, until the first match. Overlapping addresses are
allowed.
4. Regular dynamic NAT (nat)—Best match. Regular identity NAT is included in this category. The order of the NAT commands does not matter; the NAT statement that best matches the real address is used. For example, you can create a general statement to translate all addresses (0.0.0.0) on an interface. If you want to translate a subset of your network (10.1.1.1) to a different address, then you can create a statement to translate only 10.1.1.1. When 10.1.1.1 makes a connection, the specific statement for 10.1.1.1 is used because it matches the real address best. We do not recommend using overlapping statements; they use more memory and can slow the performance of the security appliance.
Basic Access list Configuration
Then you you need to configure some access lists allowing certain hosts to access resources on the internet or other connected interfaces on the firewall.Then assign and apply that access group to the inside interface
access-list inside extended permit ip any any
access-group inside in interface inside
Basic Troubleshooting commands enabling
After that’s done you have configured the basic settings on your ASA device .The bellow settings are recommended in order to troubleshoot simple connectivity and other issues you may encounter on the asa device by the ways of logging .The logging functionality on the ASA is extensive and is unparalleled in troubleshooting usefulness in determining where the problem lies .
logging enable
logging timestamp
logging buffer-size 999999
logging buffered debugging
logging trap debugging
logging history debugging
logging asdm debugging
logging facility 23
Viewing the logs on the Cisco ASA appliance
show logging | include 192.168.1.1
Best Practice management Configuration suggestions
A best practice would be to configure remote management access to a device by allowing only a few hosts to connect to the Cisco ASA device for remote management as shown bellow
ssh 196.1.1.1 255.255.255.255 outside
ssh verion 2
More Related Cisco ASA Tips:
Site-to-Site IPSEC VPN between Two Cisco ASA 5520
How to Configure Dual ISP on Cisco ASA 5505?
Cisco ASA 8.4 vs. Typical NAT/PAT Configuration
Eight Commands on a Cisco ASA Security Appliance You Should Know
VLAN Sub-Interfaces on Cisco ASA 5500 Firewall Configuration
How to Configure Cisco ASA 5505 Firewall?

Expertise Builds Trust
20+ Years • 200+ Countries • 21500+ Customers/Projects
CCIE · JNCIE · NSE7 · ACDX · HPE Master ASE · Dell Server/AI Expert
