
In this guide we will cover the tasks associated with connecting a console port to a PC, and includes the following topics:
- Console (rollover) Cable and Adapters
- Making the physical connection
- Connecting using HyperTerminal
- Troubleshooting console port problems
Console (rollover) Cable and Adapters
A console cable kit is provided with your router. Use this kit when connecting your router to a PC or terminal.
The console cable kit contains:
- RJ-45-to-RJ-45 console cable (blue)
- RJ-45-to-DB-9 adapter (gray)
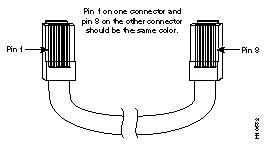
You can identify a rollover cable by comparing the two modular ends of the cable. Hold the cable’s ends side-by-side, with the tab at the back (pointing away from you). The wire connected to the pin on the outside of the left plug should be the same color as the wire connected to the pin on the outside of the right plug. (See Figure1.) If your cable came from Cisco Systems, pin 1 is white on one connector, and pin 8 is white on the other (a rollover cable reverses pins 1 and 8, 2 and 7, 3 and 6, and 4 and 5).
Figure1: Identifying a Rollover Cable
Making the physical connection
The cable and adapters required for this connection are included with the router. Follow these steps to connect the router to a terminal or PC running terminal emulation software:
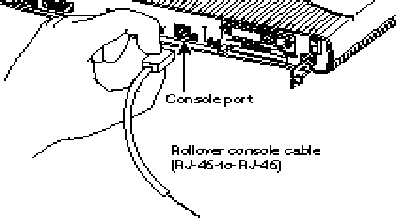
Step1. Locate the console port on the back of the router.
Step2. Connect the console (or rollover) cable to the console port on the router. (SeeFigure2.)
Step3. The console cable will need an RJ-45 to DB-25 adapter for Cisco 4000 and 7000 series routers. This adapter is supplied with the router and is also included in your verikit.
Figure2: Connecting to Console Port (1600 Series Router Shown)
Step4. Use the correct adapter to connect the other end of the cable to your terminal or PC.
Step5. If your terminal or PC has a console port that does not fit one of the adapters, you must provide the correct adapter for that port.
Connecting using HyperTerminal
Click on the HyperTerminal icon to launch a pre-configured HyperTerminal connection. This connection is configured for use with all Cisco routers. (The router should be connected to your laptop at this time. If it is not, see making the physical connection.)
Depending on your browser settings, you may initially see a message asking whether you want to open the file or save it to disk. To launch the connection now, select the “open” option. To save the connection to your local hard-drive for future use, select the “save” option.
If you selected the “open” option, you should now be communicating with the router. If you are experiencing problems, make sure the router is powered on, you are attached to the proper Com Port and verify your cabling.
Note: You may want to save this HyperTerminal configuration file to your laptop or PC for future use. (Select File > Save as… from the HyperTerminal window menu.)
Setting up a HyperTerminal connection file
Using this procedure you will create a named connection that you can save and reuse. (This creates a connection identical to the one provided above, and is included primarily for your reference.)
To set up a HyperTerminal connection on your laptop:
Step1. Click the Start button on the Windows Taskbar, and select Programs > Accessories > Communications > HyperTerminal. HyperTerminal launches and displays the Connection Description dialog box.
Alternatively, if you previously saved a connection for Cisco equipment, you can launch it by selecting Programs >Accessories >Communications >HyperTerminal > connection_name.ht. (Proceed to Step5.)
Step2. Type in a name and optionally select an Icon to represent your HyperTerminal session. Click OK. The Phone Number window appears.
Step3. Locate the Connect Using field near the bottom of the Phone Number window. Select “Direct to COM1” from the drop-down list to indicate that this connection is a local session (and not a dial-up session). Click OK. The COM1 Properties window appears.
Step4. On the Port Settings tab, enter the following settings:
- Speed-9600
- Data Bits-8
- Parity-none
- Stop bits-1
- Flow Control-none
Step5. Click OK to make the connection. The COM1 Properties window disappears. You should now see a blinking cursor in the HyperTerminal terminal window.
If there are any problems at this point, jump to Troubleshooting console port problems to isolate and fix the problem.
Saving HyperTerminal Settings for Future Use.
Step6. From the HyperTerminal menu, select File>Save. This saves the Session for future use. The new named session appears in the HyperTerminal folder represented with an icon like the one you clicked in Step3. (In the future, simply double-click this icon in the HyperTerminal folder to open the saved connection.)
Step7. Assuming you have already connected the router and laptop using a roll-over cable, you can verify that the session is active by pressing the Enter key on your laptop a couple of times. You should see the router prompt in the HyperTerminal window.
Troubleshooting console port problems
SYMPTOM: No connection.
- Check your laptop’s settings to see if COM1 is loaded.
- Click on Start > Settings > Control Panel. Within the Control Panel window, open the Systems icon. Choose the Device Manager tab, and ensure that COM1 is an option on the Ports drop-down list. If COM1 is missing, reboot your laptop and repeat this check. It should now appear.
SYMPTOM: No response from router once connected to router via console.
- Check to ensure you are using the correct cable (roll-over as opposed to straight through).
- Verify that HyperTerminal is configured to use the correct communications port.
SYMPTOM: Only getting garbage from the router.
- Ensure HyperTerminal is setup using the correct speed — 9600 Baud.
Guide Reference from https://www-tss.cisco.com/eservice/compass/common/tasks/task_console_port_connect.htm#pgfId-1001486
More Console Cable Topics:
How to Connect to a Cisco Standard Console Port (RJ-45)?
Using the Cisco 5500 Series Controller USB Console Port
How to Make Your Ethernet Crossover Cable?
Ethernet Crossover Cable vs Ethernet LAN Cable

Expertise Builds Trust
20+ Years • 200+ Countries • 21500+ Customers/Projects
CCIE · JNCIE · NSE7 · ACDX · HPE Master ASE · Dell Server/AI Expert
