

In this article we will share the simple guide that tells you how to install your Cisco RV340W and launch the web-based Device Manager.
The Cisco RV340W series of routers provide reliable internet access connectivity for small businesses.
All of the Cisco RV340W series models support two connections to one internet service provider, delivering high performance by using load balancing, or to two different providers to deliver business continuity.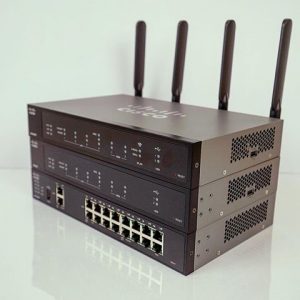
- Dual Gigabit Ethernet WAN ports allow load balancing and business continuity.
- Affordable, high-performance Gigabit Ethernet ports enable rapid transfer of large files, supporting multiple users.
- Dual USB ports support a 3G/4G modem or flash drive. The WAN can also fail over to the 3G/4G modem connected to the USB port.
- SSL VPN and site-to-site VPN enable highly secure connectivity
- Stateful packet inspection (SPI) firewall and hardware encryption provide strong security.
- A 4 LAN port switch and a WLAN access point.
Note: Firstly, read more about the installing the Cisco RV340W, Cisco RV340W Features, Technical Detail, click here
Connecting the Equipment
Connect a configuration terminal (PC) to the device by using a LAN port
The terminal must be in the same wired sub-network as the device to perform the initial configuration. As part of the initial configuration, the device can be configured to allow remote management.
To connect a computer to the device:
STEP1. Power off all equipment, including the cable or DSL modem, the computer, and this RV340W router
STEP2. Use an Ethernet cable to connect your cable or DSL modem to the WAN port on this device.
STEP3. Connect another Ethernet cable from one of the LAN (Ethernet) ports to the Ethernet port on the computer.
STEP4. Power on the WAN device and wait until the connection is active.
STEP5. Connect the power adapter to the 12VDC port of this device. The power switch is on by default. The power light on the front panel is solid green when the power adapter is connected properly and the device is finished booting.
- CAUTION: Use only the power adapter that is supplied with the device. Using a different power adapter could damage the device or cause the USB dongles to fail.
STEP6. Plug the other end of the adapter into an electrical outlet. Use the plug (supplied) specific to your country.
STEP7. Continue with the instructions in the Using the Setup Wizard to configure the device.
Using the Setup Wizard
The Setup Wizard and Device Manager are supported on Microsoft Internet Explorer, Mozilla Firefox, Apple Safari, and Google Chrome.
To configure the device using the Setup Wizard, follow these steps:
STEP1. Power on the PC that you connected to the LAN1 port in Step 3 of the Connecting Equipment section. Your PC becomes a DHCP client of the device and receives an IP address in the 192.168.1.xxx range
STEP2. Launch a web browser.
STEP3. In the address bar, enter the default IP address of the device, https://192.168.1.1. A site security certificate message is displayed. The Cisco RV340W uses a self-signed security certificate. This message appears because the device is not known to your computer.
STEP4. Click Continue to this website to continue. The sign-in page appears.
STEP5. Enter the username and password. The default username is Cisco. The default password is cisco. Passwords are case-sensitive.
STEP6. Click Log In. The Router Setup Wizard is launched.
STEP7. Follow the on-screen instructions to set up your device. The Router Setup Wizard should detect and configure your connection. If it is unable to do so, it asks you for information about your internet connection. Contact your ISP for this information.
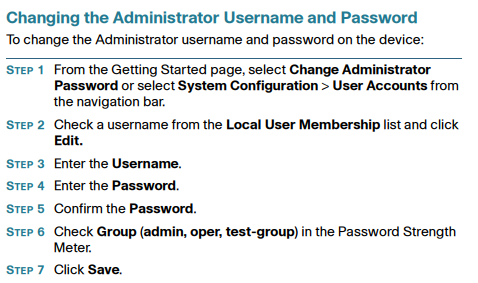
STEP8. Change the password as instructed by the Router Setup Wizard or follow the instructions in the Changing the Administrator Username and Password section. Log in to the device with the new username and password.
- NOTE: We recommend that you change the password. You are required to change the password before enabling features such as remote management. The Device Manager Getting Started page appears. It displays the most common configuration tasks.
STEP9. Click one of the tasks listed in the navigation bar to complete the configuration.
STEP10. Save any additional configuration changes and log out of the device manager
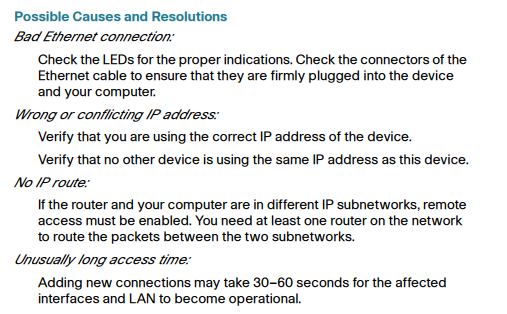
Troubleshoot Your Connection
If you cannot access your device by using the Setup Wizard, the device may not be reachable from your computer. You can test network connections by using ping on a computer running Windows:
STEP1. Open a command window by using Start > Run and enter cmd.
STEP2. At the Command window prompt, enter ping and the device IP address. For example, ping 192.168.1.1 (the default static IP address of the device).
If you can reach the device, you should get a reply similar to the following:
Pinging 192.168.1.1 with 32 bytes of data: Reply from 192.168.1.1: bytes=32 time
If you cannot reach the device, you should get a reply similar to the following:
Pinging 192.168.1.1 with 32 bytes of data: Request timed out.
Reference info from https://www.cisco.com/c/dam/en/us/td/docs/routers/csbr/RV340W/Quick_start/EN/rv340W_qsg_en.pdf
More Related
Cisco RV340W VPN Router, For Any Small-business Network that Requires…
The New Cisco RV Series VPN Routers-RV340, RV345

Expertise Builds Trust
20+ Years • 200+ Countries • 21500+ Customers/Projects
CCIE · JNCIE · NSE7 · ACDX · HPE Master ASE · Dell Server/AI Expert
