

In this article it will walks you through how to configure a Cisco wireless network. Modern business wireless networks are complicated, so configuration of the actual network should happen after system design, policy, and security decisions are made. If you haven’t taken those steps first, stop reading this, get those done, and then come back here.
In a modern Cisco wireless architecture, all configurations are done at the controller. From there, settings are pushed to the access points, and a WLAN comes to life. There are a slew of options for how a specific network will behave, so you need to know the following:
• What security type you’ll use
• If it’s 802.1x-based security, what EAP type you’ll use
• If RADIUS is in play, what are the server names and pre-shares for the controllers?
• What VLAN(s) you’ll use
• Whether the WLAN will support legacy data rates
• What SSID you’ll, and whether it will be broadcast
• Channel width for 11n networks
There are other important elements to be addressed, but these bullet points hint that your policy needs to be defined before the configuration starts. Unfortunately, many administrators try to make it up as they go, which can lead to user confusion and dissatisfaction. Sensible administrators will plan and vet a configuration with technical managers before implementation.
Controller Set Up
With a Cisco WLAN you’ll configure the controllers directly or via a management platform. Most Cisco customers with multiple controllers use Cisco’s proprietary wireless management system. The latest incarnation is called Prime Infrastructure, and marks the network giant’s march toward unification of client support and wired and wireless network management.
Prime Infrastructure isn’t absolutely necessary, and many customers still run Network Control System (NCS) and the earlier Wireless Control System (WCS). Regardless of which platform you use and what version of code the controllers are running, you’ll have some room to play with as you configure network.
Note that the following instructions assume the controllers already have proper network connectivity, including a trunk/port-channel for any required VLANs, and appropriate system-level global settings applied.
Let’s go through a fairly typical setup using these parameters:
• SSID: Synergy (will be broadcast)
• Security: WPA2 encryption
• Authentication: PEAP with MS-CHAPv2 (EAP) and MS Active Directory credential store
• Will broadcast in both 2.4 GHz and 5 GHz on dual-band 802.11n access points
• Use single VLAN (128 for this example) on 10.76.76.0. 255.255.255.0
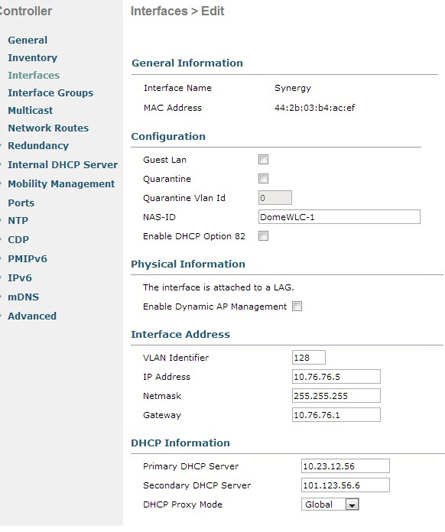
Whether working directly on controller or through the management console, the process starts with creating an Interface for the VLAN to use. The controller needs an IP address on the VLAN. (And on all VLANs that will be used on the WLAN; I’m not a fan of this requirement). Each controller in the WLAN must be similarly set up. If each interface is set up correctly, it should be pingable to test. You’ll also need to establish the functional relationship between controllers and RADIUS servers before you can proceed.
Configuring the WLAN
If you’re using Prime Infrastructure, NCS, or WCS, you’ll configure a template for each WLAN and push it to the controllers. Remember, the controllers should have the proper interfaces defined and RADIUS authentication server entries set up. We’ll proceed with how you configure the WLAN directly on the controller.
From the top navigation menu, select WLANs, then Create New from the drop-down, and hit Go. For Type, you may have options for Guest or Remote depending on your code version, but most common will be WLAN. Assign a profile name (it’s a comment field) and an SSID. For this tutorial I used “Synergy” as the SSID. Accept the ID number that the controller gives by default. Hit Apply, and you’ve just created the WLAN.
However, at this point the WLAN is unconfigured. To give our Synergy SSID the proper settings, we come back to WLANs on the navigation menu and select the newly created Synergy SSID. The four tabs will vary a bit depending on what code version you run. My example comes from code version 7.4.1.00. These tabs are important, and make a WLAN what it needs to be.
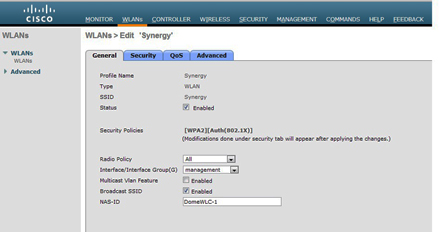
Under General, we decide whether the WLAN is enabled, if we will broadcast the SSID, and whether both radios on our dual-band access points will transmit the Synergy WLAN. We also MUST select the VLAN interface we created earlier, or the lines on the diagram where wireless meets wired will not line up and our Synergy WLAN will not function properly.
Next comes Security, which brings us to the three sub-tabs. The Layer 2 tab is where we set our WPA2-AES and 802.1x settings, and AAA Servers tab is where we choose the RADIUS servers we already added to the controller settings. The Layer 3 tab generally is not used on the typical WLAN.
Next, we go to the QoS tab. For 802.11n networks, you’ll need WMM at least Allowed, though it’s up to you whether you require it based on the client types you support. You can pick or customize a QoS class depending on your needs. You’ll get to know this page well if you’re setting up VoIP on the WLAN.
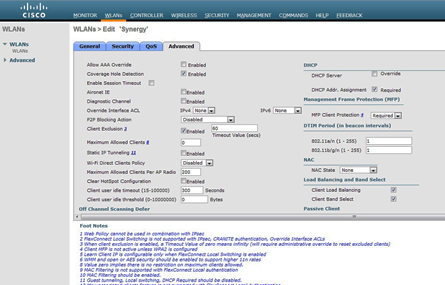
Finally, we get to the Advanced tab, where you really want to understand each field before selecting options. Again, depending on your version of code, there will be different options on this page and plenty of footnotes to go with them.
My typical settings on this page for a network like our Synergy SSID would include:
• Coverage Hole Detection–Enable. Based on a how a client is perceived versus pre-defined radio parameters, if a suspected coverage hole is reported, you can have the system attempt to “fill” it with increased power from nearby access points.
• P2P Blocking Action–Disable. This one can stir up discussion, but for clients doing things like Facetime within the same WLAN, we disable client-to-client dropping of packets. For open guest nets, you’d likely select Drop.
• Client Exclusion–Enable. I use this to protect my RADIUS servers from getting DOS’d by misconfigured client devices that continually submit bad EAP data. When enabled on the WLAN, and properly set up in global security settings on the controller, misbehaving clients are allowed three bad auths (not adjustable) and not allowed to try again for the duration of the timeout value.
• Client User Idle Timeout–300 Seconds (typical). If clients on the VLAN are not active within this period, the system drops them and requires re-authentication to get back in service.
• DHCP Addr. Assignment Required–Select. This helps prevent duplicate IP address conditions among clients by requiring all to get an address from DHCP servers, and disallows static IP address on clients.
• Client Load Balancing- Enable (with caution). This setting helps keep an even balance of clients across APs in a given area, but it’s a setting you have to read up on to get right.
• Band Select–Enable. If you want to move as many dual-band clients as possible to the 5 GHz side of your dual-band APs, enable this setting. The system uses probe suppression on 2.4 GHz to achieve this, but some clients can struggle a bit. Sometimes Band Select is a trial-and-error exercise.
As you get your WLAN into production, you may revisit this page in the management interface to tweak these settings, or add or remove settings.
Save the configuration, and just like that, the APs on the controller are now broadcasting the Synergy SSID for clients to use. But wait… there’s more.
Controlling AP Groups
By default, all APs on a controller will transmit all configured SSIDs. When controllers host hundreds of access points, it’s a fair bet that you may want some SSIDs to be transmitted everywhere, and others to be limited to targeted coverage areas. Most wireless systems provide for this.
In Cisco’s WLAN configs, you use the “AP Groups” feature to map SSID combinations to specific APs. But be warned–changing the Group for an access point makes it reboot, so consider this a maintenance action to be undertaken when you won’t disrupt clients.
Don’t Forget The Clients!
For secure wireless networks we manipulate a fair number of settings to make the WLAN what we need it to be. The wireless profiles of clients need to configure to match. How to get lots of client devices properly configured for the WLAN is this is often one of the more challenging parts of client support. The complexity of the WLAN will drive what goes into setting up the clients.
—Reference from https://www.networkcomputing.com/wireless
More Related Cisco Network Tips:
Wireless Network: How to Configure Wireless Security?
Simple Ways to Secure Wireless Network
Cisco Ushers in the Next Generation in Enterprise Class Wi-Fi Connectivity
Antenna Product Portfolio for Cisco Aironet 802.11n Access Points


