
This article is written by Lauren Malhoit talking about setting up a Cisco ASA 5505 firewall with a wireless router focuses on things you might encounter when doing the setup at home.
The following detailed story is Lauren Malhoit’s experience of dealing with setting up Cisco 5510 with a wireless router.
“I’ve been working on getting a Cisco ASA 5505 firewall set up at home so that eventually I can create a site-to-site VPN between my house and my office. I’ve written several posts about setting up Cisco 5510s, but this piece focuses on common things you might encounter at home like not having a static IP from your ISP or utilizing your current wireless router. In my case I’m using a NetGear WNDR3700, but I’ll go over what you need to do at a high level, which should work with any wireless router.
The firewall setup can seem a little daunting, especially because you will most likely lose your Internet access while you’re doing it. Remember there are only four basic things you need to configure to get Internet access.
- You should configure the inside and outside interfaces.
- You need a default route that tells your devices where to go.
- You need to configure Port Address Translation (PAT). This is what allows you to only have one IP address from your ISP, but you can have several devices connected on your internal network in a many-to-one configuration.
- You need access rules that open ports so your devices can browse web pages, download from FTP sites, etc.
Initial Setup and Configuration of Interfaces
- Connect the network cable from the modem to port 0 (default outside port) on the ASA.
- Connect your computer to one of the other ports on the ASA, which should be on the inside network by default. Ports 6 and 7 are Power over Ethernet (PoE) ports; I recommend reserving those ports for any devices that can use PoE.
- Open a browser on your computer and go to 192.168.1.1, which is the default address for connecting to the Cisco ASA.
- Click Run ASDM. (Another option is to click Run Startup Wizard and do this entire configuration in the wizard.)
- Log in. There are no passwords configured yet, so just leave that blank.
- Click Configuration at the top.
- Click Device Setup.
- Click Interfaces.
- Edit the Inside Interface.
- Make sure it is enabled.
- Specify the internal address you want to use. By default this is 192.168.1.1, which you can leave it at. This will indicate that you are using the 192.168.1.0/24 network as your inside network.
- Click OK.
- Edit the Outside Interface.
- Choose DHCP. If you happen to have a fixed IP at home, please use that. Many ISPs require you to have a business account to get a static IP, though.
- Make sure the interface is enabled.
- Put a check mark next to the option Obtain Default Route Using DHCP. This saves you the step of configuring a static route, and it saves you the hassle of having to change the static route every time your IP changes.
- Click OK.
- Put a check next to Enable Traffic between Two or More Interfaces Which Are Configured with the Same Security Levels and next to Enable Traffic between Two or More Hosts Connected to the Same Interface.
Those 18 steps take care of the first two basic things I spoke about before: configuring your interfaces and setting up a default route. Now to configure PAT and the access rules.
Configure PAT
- Click Firewall while still under the Configuration tab.
- Click NAT Rules.
- Click Add.
- Click Add Dynamic Rule.
- For the original source you can just leave it set at Any (or you can specify the inside network).
- For the translated interface put the outside interface.
- Click OK.
Configure Access Rules
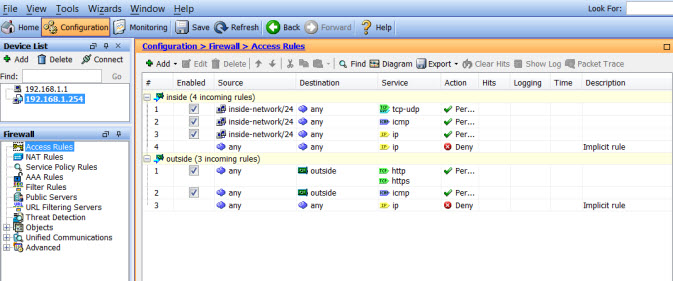
You’ll most likely want to allow HTTP/HTTPS traffic on your ASA. Make sure you add rules for the inside and the outside to permit these, along with any other protocols that might be necessary such as FTP, ICMP, etc. Use Figure A as a reference for the kind of configuration you may need.
Figure A
Configure Your Wireless Router to Act Like an Access Point
This covers setting up the ASA, but you still want to be able to use your wireless router to connect all your laptops, printers, Rokus, etc. The easiest way (though not the only way) to do this is to configure your wireless router to act just as an access point (AP).
In general, you’ll want to disconnect the network cable from the WAN, or outside, port on the AP. Then connect to the management interface of your AP, most likely via a browser while your computer is connected to the AP. Some newer APs have an option to just put a check next to AP Mode and it will do it automatically. However, if you don’t have that option, just make sure you turn off DHCP (use the ASA as your DHCP server) and configure the LAN settings to be on the same network as your ASA.
In my example, you might configure the AP with an IP of 192.168.1.15, a subnet mask of 255.255.255.0, and then the default gateway should be the IP address of the ASA. Now connect one of the LAN, or inside, ports to one of the inside ports on the Cisco ASA (ports 1-7). You may need to reboot the AP, but now you should be able to connect wirelessly and have Internet access through the firewall.”
—Article resource from https://www.techrepublic.com
More Related Cisco ASA Tips and Guides:
The Way to Activate Your Cisco ASA 5500
Cisco ASA 5520 Basic Configuration Guide
Configuring Static NAT on a Cisco ASA Security Appliance
Site-to-Site IPSEC VPN between Two Cisco ASA 5520
How to Configure Dual ISP on Cisco ASA 5505?

Expertise Builds Trust
20+ Years • 200+ Countries • 21500+ Customers/Projects
CCIE · JNCIE · NSE7 · ACDX · HPE Master ASE · Dell Server/AI Expert
