
The scenario of configuring site-to-site VPN between two Cisco Adaptive Security Appliances is often used by companies that have more than one geographical location sharing the same resources, documents, servers, etc. The Cisco ASA is often used as VPN terminator, supporting a variety of VPN types and protocols.
In this tutorial, we are going to configure a site-to-site VPN using IKEv2. IKEv2 is the new standard for configuring IPSEC VPNs. Although the legacy IKEv1 is widely used in real world networks, it’s good to know how to configure IKEv2 as well since this is usually required in high-security VPN networks (for compliance purposes).
As described in the topology scenario below, a VPN tunnel will be created between ASA1 and ASA2, connecting the two company sites, HQ and Branch1. Behind each security appliance there is a private LAN network. After configuring the VPN tunnel, the private LAN networks in HQ and Branch1 (two geographically dispersed locations) will be able to communicate over the internet and share resources.
We will refer to the diagram below for this configuration tutorial.
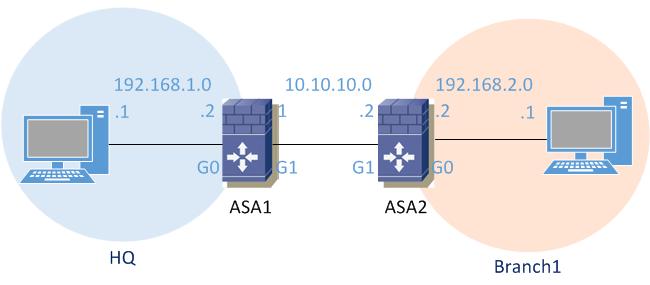
We will start by configuring IP addressing. On ASA1 and ASA2, we will configure the inside interfaces as connected to LAN and the outside interfaces facing the VPN tunnel. In real world networks, the outside interfaces will be on a different subnet and use public IP addressing. Here we will use 10.10.10.0/24 for the outside network just for making things easier.
ASA1
ASA1(config)# interface GigabitEthernet0
ASA1(config-if)# nameif inside
INFO: Security level for “inside” set to 100 by default.
ASA1(config-if)# ip address 192.168.1.2 255.255.255.0
ASA1(config-if)# no shutdown
ASA1(config-if)# interface GigabitEthernet1
ASA1(config-if)# nameif outside
INFO: Security level for “outside” set to 0 by default.
ASA1(config-if)# ip address 10.10.10.1 255.255.255.0
ASA1(config-if)# no shutdown
ASA1# show interfaces ip brief
Interface IP-Address OK? Method Status Protocol
GigabitEthernet0 192.168.1.2 YES manual up up
GigabitEthernet1 10.10.10.1 YES manual up up
ASA2
ASA2(config)# interface GigabitEthernet0
ASA2(config-if)# nameif inside
INFO: Security level for “inside” set to 100 by default.
ASA2(config-if)# ip address 192.168.2.2 255.255.255.0
ASA2(config-if)# no shutdown
ASA2(config-if)# interface GigabitEthernet1
ASA2(config-if)# nameif outside
INFO: Security level for “outside” set to 0 by default.
ASA2(config-if)# ip address 10.10.10.2 255.255.255.0
ASA2(config-if)# no shutdown
ASA2# show interfaces ip brief
Interface IP-Address OK? Method Status Protocol
GigabitEthernet0 192.168.2.2 YES manual up up
GigabitEthernet1 10.10.10.2 YES manual up up
Next, we will configure the ISAKMP policies with IKEv2. We will first use the crypto ikev2 policy command to enter IKEv2 policy configuration mode, where we will configure the IKEv2 parameters.
In this scenario, we used 3DES encryption with Diffie-Hellman group 2, hash function SHA-1 and an encryption key lifetime of 43200 seconds (12 hours).
ASA1
ASA1(config)# crypto ikev2 policy 1
ASA1(config-ikev2-policy)# group 2
ASA1(config-ikev2-policy)# encryption 3des
ASA1(config-ikev2-policy)# prf sha
ASA1(config-ikev2-policy)# lifetime seconds 43200
Finally, after the parameters have been set, we will enable IKEv2 on the outside interface
ASA1(config-ikev2-policy)# crypto ikev2 enable outside
ASA2
ASA2(config)# crypto ikev2 policy 1
ASA2(config-ikev2-policy)# group 2
ASA2(config-ikev2-policy)# encryption 3des
ASA2(config-ikev2-policy)# prf sha
ASA2(config-ikev2-policy)# lifetime seconds 43200
ASA2(config-ikev2-policy)# crypto ikev2 enable outside
Next, we will configure IKEv2 proposal. As opposed to IKEv1, where we configured a transform set that combines the encryption and authentication method, with IKEv2 we can configure multiple encryption and authentication types, and multiple integrity algorithms for a single policy.
For this scenario, we will first enter ipsec proposal configuration mode and there set the parameters.
ASA1
ASA1(config)#crypto ipsec ikev2 ipsec-proposal P1
ASA1(config-ipsec-proposal)#protocol esp encryption 3des aes des
ASA1(config-ipsec-proposal)#protocol esp integrity sha-1
ASA2
The same configuration is applied to ASA2.
ASA2(config)# crypto ipsec ikev2 ipsec-proposal P1
ASA2(config-ipsec-proposal)# protocol esp encryption 3des aes des
ASA2(config-ipsec-proposal)# protocol esp integrity sha-1
Next we need to identify the VPN interesting traffic with an access list.
ASA1(config)# access-list ACL1 extended permit ip 192.168.1.0 255.255.255.0 192.168.2.0 255.255.255.0
The mirror ACL should be configured on ASA2.
ASA2(config)# access-list ACL2 extended permit ip 192.168.2.0 255.255.255.0 192.168.1.0 255.255.255.0
The next step is to define a tunnel group. There are two default tunnel groups in the ASA: DefaultRAGroup is the default IPsec remote-access tunnel group and DefaultL2Lgroup is the default IPsec LAN-to-LAN tunnel group.
To establish a LAN-to-LAN connection, two attributes must be set:
Connection type – IPsec LAN-to-LAN.
Authentication method for the IP – in this scenario we will use preshared key for IKEv2.
The name of the tunnel is the IP address of the peer. IKEv2 preshared key is configured as 32fjsk0392fg.
NOTE: For ikev2 you can have asymmetric pre-shared keys. You can configure a different local and different remote pre-shared key. If you want to have a configuration similar with the legacy ikev1 technology, you need to have the same local and remote pre-shared keys (as we do in our example below)
ASA1
ASA1(config)# tunnel-group 10.10.10.2 type ipsec-l2l
ASA1(config)# tunnel-group 10.10.10.2 ipsec-attributes
ASA1(config-tunnel-ipsec)# ikev2 local-authentication pre-shared-key 32fjsk0392fg
ASA1(config-tunnel-ipsec)# ikev2 remote-authentication pre-shared-key 32fjsk0392fg
ASA2
ASA2(config)# tunnel-group 10.10.10.1 type ipsec-l2l
ASA2(config)# tunnel-group 10.10.10.1 ipsec-attributes
ASA2(config-tunnel-ipsec)# ikev2 local-authentication pre-shared-key 32fjsk0392fg
ASA2(config-tunnel-ipsec)# ikev2 remote-authentication pre-shared-key 32fjsk0392fg
Finally, we will create a crypto map linking the access list, the peer and the IKEv2 proposal. We will apply this crypto map to the ASA outside interface.
ASA1
ASA1(config)# crypto map cmap 1 match address ACL1
ASA1(config)# crypto map cmap 1 set peer 10.10.10.2
ASA1(config)# crypto map cmap 1 set ikev2 ipsec-proposal P1
ASA1(config)# crypto map cmap interface outside
ASA2
Similar configuration will be applied to ASA2:
ASA2(config)# crypto map cmap 1 match address ACL2
ASA2(config)# crypto map cmap 1 set peer 10.10.10.1
ASA2(config)# crypto map cmap 1 set ikev2 ipsec-proposal P1
ASA2(config)# crypto map cmap interface outside
—Reference from https://www.tech21century.com
More Related Networking Tips:
Site-to-Site IPSEC VPN between Two Cisco ASA 5520
Configuring Static NAT on a Cisco ASA Security Appliance
EIGRP on a Cisco ASA Firewall Configuration
How to Set up a Cisco ASA 5505 Firewall with a Wireless Router?
How to Configure Cisco ASA 5505 Firewall?

Expertise Builds Trust
20+ Years • 200+ Countries • 21500+ Customers/Projects
CCIE · JNCIE · NSE7 · ACDX · HPE Master ASE · Dell Server/AI Expert
