

The Cisco Adaptive Security Appliance is an integrated security equipment that can perform a variety of functions like firewall, intrusion prevention, VPN, content security, unified communications, and remote access. Among these functions, the ASA can also perform routing using popular routing protocol like Routing Information Protocol (RIP), Enhanced Interior Gateway Routing Protocol (EIGRP), Open Shortest Path First (OSPF) or static routes.
In this tutorial, we are going to focus on configuring EIGRP. We will take the steps on how to configure the Adaptive Security Appliance to perform routing functions, exchange routing updates and redistribute a static route.
In our example scenario, we will refer to the diagram below.
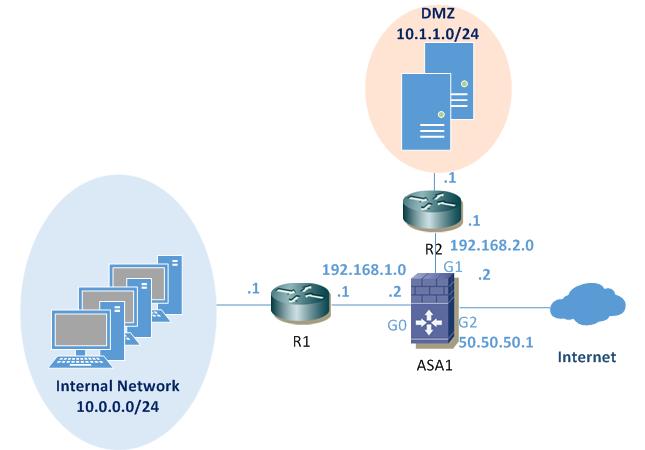
In this particular scenario, the routers R1 and R2 and the ASA all participate in the EIGRP process. R1 is in the internal network and R2 in the DMZ. A static default route to the Internet outside interface of ASA will be configured and redistributed into the EIGRP process.
We will start by configuring IP addressing and EIGRP on the two routers R1 and R2.
Router R1 Configuration:
R1#configure terminal
Enter configuration commands, one per line. End with CNTL/Z.
R1(config)#interface FastEthernet0/0
R1(config-if)#ip address 192.168.1.1 255.255.255.0
R1(config-if)#no shutdown
R1(config-if)#exit
R1(config)#interface FastEthernet1/0
R1(config-if)#ip address 10.0.0.1 255.255.255.0
R1(config-if)#no shutdown
R1(config-if)#exit
R1(config)#router eigrp 10
R1(config-router)#network 10.0.0.0 0.0.0.255
R1(config-router)#network 192.168.1.0 0.0.0.255
R1(config-router)#no auto-summary
R1(config-router)#end
Router R2 Configuration:
R2#configure terminal
Enter configuration commands, one per line. End with CNTL/Z.
R2(config)#interface FastEthernet0/0
R2(config-if)#ip address 192.168.2.1 255.255.255.0
R2(config-if)#no shutdown
R2(config-if)#exit
R2(config)#interface FastEthernet1/0
R2(config-if)#ip address 10.1.1.1 255.255.255.0
R2(config-if)#no shutdown
R2(config-if)#exit
R2(config)#router eigrp 10
R2(config-router)# network 10.1.1.0 0.0.0.255
R2(config-router)#network 192.168.2.0 0.0.0.255
R2(config-router)#no auto-summary
R2(config-router)#end
Now, we will configure the ASA, this being the core of our tutorial here. The ASA will be separating the three zones in the network: Inside network, DMZ and Outside network. This appliance is designed primarily to work at the boundary between internal and external networks. Accordingly, the ASA uses different security levels that are associated with each interface. The security level is a number that varies between 0 and 100. This value signifies the level of trust for the network that the interface is connected to.
For the interface that will be configured inside, it will be assigned a default maximum trust level of 100 and for the outside interface the default value is 0, minimum trust. We can change that level any time, but for the scope of this tutorial we will leave the default values. Also, we will configure an additional interface “DMZ”, assigning a security level of 50.
Cisco ASA Configuration:
ASA1# configure terminal
ASA1(config)# interface GigabitEthernet0
ASA1(config-if)# description outside interface connected to Internet
ASA1(config-if)# nameif outside
ASA1(config-if)# security-level 0
ASA1(config-if)# ip address 50.50.50.1 255.255.255.0
ASA1(config-if)# exit
ASA1(config)# interface GigabitEthernet1
ASA1(config-if)# description Inside interface connected to R1
ASA1(config-if)# nameif inside
ASA1(config-if)# security-level 100
ASA1(config-if)# ip address 192.168.1.2 255.255.255.0
ASA1(config-if)# exit
ASA1(config)# interface GigabitEthernet2
ASA1(config-if)# description DMZ interface connected to R2
ASA1(config-if)# nameif dmz
ASA1(config-if)# security-level 50
ASA1(config-if)# ip address 192.168.2.2 255.255.255.0
ASA1(config-if)# exit
The outside interface of ASA1 will be connected to the internet and for the scope of this lab we will use it just to have a default route and we will assign IP address 50.50.50.1 with default gateway next hop 50.50.50.2. This default route will be redistributed from ASA1 to the rest of the EIGRP domain.
Next, we will configure EIGRP on ASA1, add a default static route and redistribute it into the EIGRP process.
ASA1(config)# router eigrp 10
ASA1(config-router)# network 192.168.1.0 255.255.255.0
ASA1(config-router)# network 192.168.2.0 255.255.255.0
ASA1(config-router)# no auto-summary
ASA1(config-router)# redistribute static
ASA1(config-router)#end
ASA1# route outside 0.0.0.0 0.0.0.0 50.50.50.2
Once the EIGRP is configured we can now verify that it has established neighbor relationships with the peers and that it redistributed the default static route:
Verification Commands:
ASA1# show eigrp neighbors
EIGRP-IPv4 neighbors for process 10
H Address Interface Hold Uptime SRTT RTO Q Seq (sec) (ms) Cnt Num1 192.168.2.1 Gi2 13 00:16:28 27 200 0 3
0 192.168.1.1 Gi1 11 00:16:28 13 200 0 5
ASA1# show eigrp topology
EIGRP-IPv4 Topology Table for AS(10)/ID(192.168.2.2)
Codes: P – Passive, A – Active, U – Update, Q – Query, R – Reply,
r – reply Status, s – sia Status
P 0.0.0.0 0.0.0.0, 1 successors, FD is 28160
via Rstatic (28160/0)
P 10.0.0.0 255.255.255.0, 1 successors, FD is 30720
via 192.168.1.1 (30720/28160), GigabitEthernet1
P 10.1.1.0 255.255.255.0, 1 successors, FD is 30720
via 192.168.2.1 (30720/28160), GigabitEthernet2
P 192.168.1.0 255.255.255.0, 1 successors, FD is 28160
via Connected, GigabitEthernet1
P 192.168.2.0 255.255.255.0, 1 successors, FD is 28160
via Connected, GigabitEthernet2
ASA1# show eigrp interfaces
EIGRP-IPv4 interfaces for process 10
Xmit Queue Mean Pacing Time Multicast Pending
Interface Peers Un/Reliable SRTT Un/Reliable Flow Timer Routes
inside 1 0/0 13 0/1 105 0
dmz 1 0/0 27 0/1 89 0
ASA1# show route
Codes: C – connected, S – static, I – IGRP, R – RIP, M – mobile, B – BGP
D – EIGRP, EX – EIGRP external, O – OSPF, IA – OSPF inter area
N1 – OSPF NSSA external type 1, N2 – OSPF NSSA external type 2
E1 – OSPF external type 1, E2 – OSPF external type 2, E – EGP
i – IS-IS, L1 – IS-IS level-1, L2 – IS-IS level-2, ia – IS-IS inter area
* – candidate default, U – per-user static route, o – ODR
P – periodic downloaded static routeGateway of last resort is 50.50.50.2 to network 0.0.0.0
C 50.50.50.0 255.255.255.0 is directly connected, outside
D 10.0.0.0 255.255.255.0 [90/30720] via 192.168.1.1, 0:19:52, inside
D 10.1.1.0 255.255.255.0 [90/30720] via 192.168.2.1, 0:19:53, dmz
C 192.168.1.0 255.255.255.0 is directly connected, inside
C 192.168.2.0 255.255.255.0 is directly connected, dmz
S* 0.0.0.0 0.0.0.0 [1/0] via 50.50.50.2, outside
Let’s also verify the routing updates received by the routers. They should see the other networks attached to ASA1 and the injected static default route:
R1#show ip route
Codes: C – connected, S – static, R – RIP, M – mobile, B – BGP
D – EIGRP, EX – EIGRP external, O – OSPF, IA – OSPF inter area
N1 – OSPF NSSA external type 1, N2 – OSPF NSSA external type 2
E1 – OSPF external type 1, E2 – OSPF external type 2
i – IS-IS, su – IS-IS summary, L1 – IS-IS level-1, L2 – IS-IS level-2
ia – IS-IS inter area, * – candidate default, U – per-user static route
o – ODR, P – periodic downloaded static routeGateway of last resort is 192.168.1.2 to network 0.0.0.0
10.0.0.0/24 is subnetted, 2 subnets
D 10.1.1.0 [90/33280] via 192.168.1.2, 00:20:44, FastEthernet0/0
C 10.0.0.0 is directly connected, FastEthernet1/0
C 192.168.1.0/24 is directly connected, FastEthernet0/0
D 192.168.2.0/24 [90/30720] via 192.168.1.2, 00:20:45, FastEthernet0/0
D*EX 0.0.0.0/0 [170/30720] via 192.168.1.2, 00:20:45, FastEthernet0/0
R2#show ip route
Codes: C – connected, S – static, R – RIP, M – mobile, B – BGP
D – EIGRP, EX – EIGRP external, O – OSPF, IA – OSPF inter area
N1 – OSPF NSSA external type 1, N2 – OSPF NSSA external type 2
E1 – OSPF external type 1, E2 – OSPF external type 2
i – IS-IS, su – IS-IS summary, L1 – IS-IS level-1, L2 – IS-IS level-2
ia – IS-IS inter area, * – candidate default, U – per-user static route
o – ODR, P – periodic downloaded static routeGateway of last resort is 192.168.2.2 to network 0.0.0.0
10.0.0.0/24 is subnetted, 2 subnets
C 10.1.1.0 is directly connected, FastEthernet1/0
D 10.0.0.0 [90/33280] via 192.168.2.2, 00:22:21, FastEthernet0/0
D 192.168.1.0/24 [90/30720] via 192.168.2.2, 00:22:21, FastEthernet0/0
C 192.168.2.0/24 is directly connected, FastEthernet0/0
D*EX 0.0.0.0/0 [170/30720] via 192.168.2.2, 00:22:21, FastEthernet0/0
We now have in place the three networks separated by ASA1, with different security levels assigned, that exchange routing information. The ASA will perform stateful inspection by default , so access lists must be configured in order to have connectivity between the various security zones.
—Article reference from https://www.tech21century.com
More…
How to Configure SNMP on Cisco IOS-based Router/Switch?
Basic Information of Configuring HSRP on a Cisco Router
How to Configure IGRP (Interior Gateway Routing Protocol)?
Configuring a Cisco Wireless Network
How to Set up a Cisco ASA 5505 Firewall with a Wireless Router?

Expertise Builds Trust
20+ Years • 200+ Countries • 21500+ Customers/Projects
CCIE · JNCIE · NSE7 · ACDX · HPE Master ASE · Dell Server/AI Expert
